Automating smart snapshot and cleanup processes for a WordPress website is crucial for maintaining site performance, security, and efficient use of resources. This guide will help you set up a system for automated snapshots and cleanup tasks.
Understand the Importance
Snapshots
Regular backups, also known as snapshots, are the backbone of a resilient website management strategy. They serve as a safety net, allowing you to restore your site swiftly in the face of unforeseen events such as data loss, security breaches, or errors. Imagine losing critical data or encountering a malicious attack – having a recent snapshot ensures you can revert to a stable state with minimal downtime.
Cleanup
In addition to snapshots, effective cleanup processes are integral to maintaining a healthy WordPress site. Over time, websites accumulate unnecessary data that can bog down performance and consume valuable storage space. Cleanup tasks optimize database performance by removing redundant information, ultimately enhancing your site’s speed and responsiveness. By reducing storage requirements, cleanup contributes to efficient resource utilization, saving both server and user bandwidth.
Together, snapshots and cleanup form a dynamic duo, safeguarding your website from potential disasters and ensuring it operates at its optimal potential.
Choose a Backup Plugin
Select a reliable WordPress backup plugin such as Advanced WP Reset to eliminate white screens from your website experience by implementing scheduled snapshots. These snapshots act as a reliable safety net, offering a restorable backup whenever the need arises.
Configure Automated Backups
Now that you’ve selected a reliable backup plugin, it’s time to set up automated backup schedules and ensure your snapshots are securely stored. Follow these steps to configure automated backups efficiently:
Install and Activate Your Chosen Backup Plugin
- Head to your WordPress dashboard.
- Navigate to the “Plugins” section and click on “Add New.”
- Search for your chosen backup plugin (e.g., Advanced WP Reset) and click “Install.”
- Once installed, activate the plugin.
Now, let’s delve into the steps involved in setting up this efficient solution:
Step 1: Take a snapshot
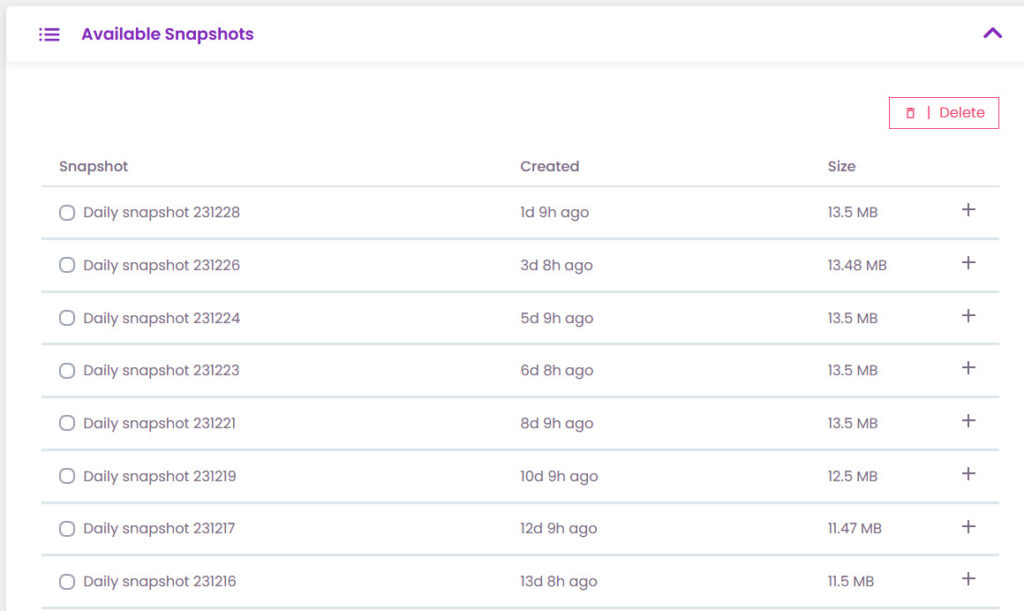
Take a snapshot by going to your tools, select you chosen plugin which is in this case Advanced WP Reset then go to snapshots and give it a name

Depending on your entries, you’ll see a list of your available snapshots. Choose the relevant one and proceed.
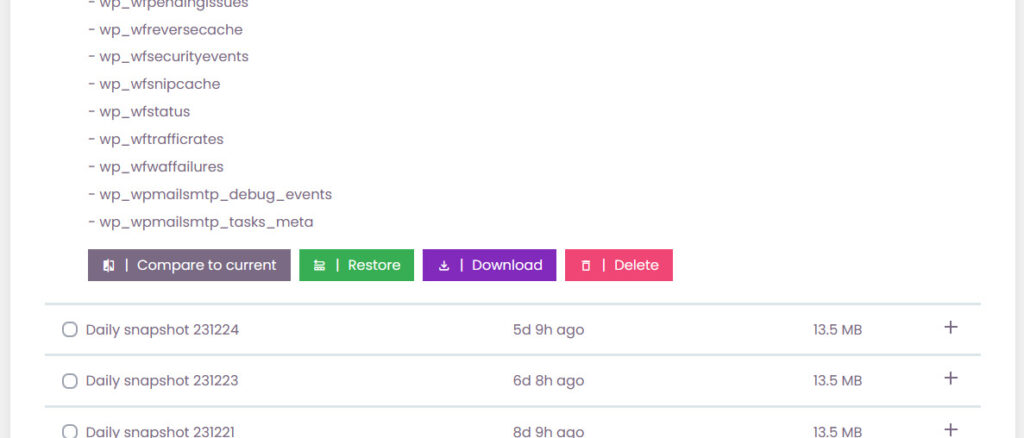
Step 2: Download snapshot and restore it
Step 3: Enable automated snapshots
Now that you have completed the previous steps, you can schedule snapshots but first you’ll need to download the Advanced WP Reset Pro Version

If you have the pro version, you should be able to see the following:

By completing these steps, you’ve established a foundation for automated backups. Your WordPress website will now routinely create snapshots according to your defined schedule and securely store them externally, safeguarding your site against potential data loss.
You can watch the following video for full and more detailed information
Cleanup Tasks
Effective cleanup tasks are essential for maintaining optimal performance and ensuring efficient resource utilization on your WordPress website. Follow these steps to keep your database and file system in top shape.
Database Cleanup
Step 1: Schedule Regular Database Optimization
- Access your chosen backup plugin’s settings.
- Look for database optimization features or options to clean up unnecessary data.
- Schedule regular optimization tasks to keep your database lean and responsive.
Step 2: Utilize Cleanup Features
- Leverage the plugin’s built-in cleanup features to streamline your database.
- Remove unnecessary elements such as post revisions, spam comments, and transient options that accumulate over time.
File Cleanup
Step 3: Set Up Rules for Old Backup Files
- Establish rules within your backup plugin to automatically remove old backup files after a specified period.
- Regularly assess your backup storage and ensure it doesn’t become cluttered with outdated files.
Step 4: Delete Unused Themes and Plugins
- Navigate to the “Themes” and “Plugins” sections in your WordPress dashboard.
- Identify and delete any themes or plugins that are no longer in use.
- Unused themes and plugins not only take up space but can also pose security risks if not updated.
By regularly performing these cleanup tasks, you not only optimize your website’s performance but also contribute to a more secure and efficient WordPress environment.
Monitor Disk Space
Step 1: Set Up Notifications for Low Disk Space
- Configure your server or utilize a monitoring tool to receive notifications when your disk space is running low.
- Immediate alerts allow you to address potential issues before they impact your website’s performance.
Step 2: Implement an Automated Process for Low Disk Space
- Consider setting up an automated process to handle low disk space situations:
- Increase Storage Capacity: Automate the process of expanding storage when disk space is limited. This could involve upgrading your hosting plan or allocating additional space.
- Clean Up Old Backups: Implement a mechanism to automatically delete older backups when disk space is nearing its limit. This ensures you have room for new backups.
Step 3: Regularly Review and Adjust
- Periodically review the effectiveness of your automated disk space management.
- Adjust thresholds and rules based on the growth of your website and backup storage requirements.
Monitoring and addressing low disk space proactively ensures that your WordPress website can continue to operate smoothly without disruptions.
Security Considerations
Step 1: Ensure Secure Backup Storage
- Confirm that your backups are stored in a secure location, preferably an external storage solution.
- Employ encryption and access controls to ensure that only authorized personnel can retrieve or modify backup files.
Step 2: Regularly Test Backup Restoration
- Periodically test the backup restoration process to verify its effectiveness.
- Ensure that you can successfully restore your site from a backup and that the restored version functions correctly.
Step 3: Access Control for Backup Files
- Restrict access to backup files to authorized personnel only.
- Implement strong authentication mechanisms to prevent unauthorized access to sensitive backup data.
Step 4: Keep Backup Plugins Updated
- Regularly update your chosen backup plugin to the latest version.
- Plugin updates often include security patches that protect against potential vulnerabilities.
Step 5: Monitor User Access
- Regularly review and audit user access to the backup system.
- Remove access for users who no longer require it and update credentials periodically.
By adhering to these security measures, you enhance the overall resilience of your automated snapshot and cleanup system, ensuring that your website’s data remains protected.
Logging and Reports
Step 1: Enable Logging for Backup and Cleanup Activities
- Access your chosen backup plugin’s settings.
- Look for options related to logging and enable them to track backup and cleanup activities.
- Detailed logs provide insights into the status and outcomes of these automated processes.
Step 2: Regularly Review Logs
- Set a routine to review the logs generated by the backup plugin.
- Check for any warnings or errors that might indicate issues with the backup or cleanup processes.
- Address any anomalies promptly to maintain the reliability of your automated system.
Step 3: Troubleshoot Issues
- In the event of errors or unexpected behavior, use the logs to troubleshoot and identify the root cause.
- Leverage online resources, forums, or the support channels of your chosen backup plugin to seek guidance if needed.
Step 4: Generate Reports
- Some backup plugins provide reporting features. Explore these options to generate regular reports summarizing backup and cleanup activities.
- Reports can be useful for documentation purposes and for keeping stakeholders informed about the health of your website’s backup system.
By incorporating logging and reports into your automated snapshot and cleanup processes, you establish a transparent and accountable system that aids in monitoring, troubleshooting, and maintaining the overall health of your WordPress website.
Testing
Step 1: Set Up a Staging Environment
- Before implementing automated processes on your live website, create a staging environment that mirrors your live site’s configuration.
- Staging environments allow you to test changes without affecting the live site.
Step 2: Configure Automated Processes in Staging
- Install and configure your chosen backup plugin in the staging environment.
- Set up automated snapshot and cleanup processes with the same settings you plan to use on the live site.
Step 3: Simulate Backup and Cleanup Scenarios
- Initiate automated backup and cleanup tasks in the staging environment.
- Observe the process and ensure that each step functions as expected.
Step 4: Verify Restoration Process
- Test the restoration process by reverting your staging site to a backup.
- Confirm that the site is successfully restored and that all functionalities are intact.
Step 5: Identify and Resolve Issues
- If any issues arise during testing, use the staging environment to identify and resolve them.
- This ensures that potential problems are addressed before implementing changes on the live site.
Step 6: Document Testing Results
- Document the results of your testing, including any challenges faced and solutions implemented.
- Use this documentation as a reference for future troubleshooting and improvement.
Testing your automated snapshot and cleanup processes in a controlled staging environment helps ensure a smooth transition to the live site, minimizing the risk of disruptions and errors.
Update and Maintain
Step 1: Keep Backup Plugin Updated
- Regularly check for updates to your chosen backup plugin.
- Install updates promptly to benefit from bug fixes, performance improvements, and security patches.
Step 2: Update WordPress Core, Themes, and Plugins
- Ensure your WordPress core, themes, and plugins are up to date.
- Regular updates provide new features, enhance security, and improve overall stability.
Step 3: Periodically Review Backup and Cleanup Settings
- Schedule routine reviews of your backup and cleanup settings.
- Adjust configurations based on changes in your website’s structure, content, or performance needs.
Step 4: Automation for Updates
- Explore automation options for updating your backup plugin and WordPress components.
- Some plugins offer automated update features that can streamline the process.
By maintaining up-to-date software and periodically reviewing your backup and cleanup settings, you ensure that your automated system remains effective and aligned with the evolving needs of your WordPress website.
11. Documentation
Step 1: Document Automated Backup and Cleanup Processes
- Create a comprehensive document outlining the steps involved in your automated snapshot and cleanup processes.
- Include details such as the chosen backup plugin settings, scheduled tasks, and any specific configurations.
Step 2: Include Contact Information for Support
- Provide contact information for support, whether it’s for the backup plugin, hosting provider, or any other relevant service.
- This ensures quick access to assistance in case issues arise during the automated processes.
Step 3: Version Information
- Document the versions of your backup plugin, WordPress core, themes, and plugins in use.
- This information can be crucial for troubleshooting and ensuring compatibility during future updates.
Step 4: Detailed Instructions
- Include detailed instructions for restoring a backup in case of emergencies.
- Step-by-step guidance can be invaluable during critical situations.
Step 5: Accessibility
- Ensure that the documentation is accessible to all relevant personnel involved in managing the website.
- Consider storing the documentation in a secure location with controlled access.
Step 6: Regularly Update Documentation
- Periodically review and update the documentation as needed.
- Incorporate any changes made to the automated processes, software versions, or contact information.
Documentation serves as a valuable resource for maintaining continuity in your automated backup and cleanup procedures, helping ensure a quick and effective response to any challenges that may arise.
12. Regularly Review and Improve
Step 1: Periodic Strategy Review
- Set a schedule for periodic reviews of your backup and cleanup strategy.
- Assess whether the current system continues to meet the evolving needs of your website.
Step 2: Adjust Based on Changes
- Adapt your backup and cleanup settings based on any changes in your website’s structure, content, or user interactions.
- Stay attentive to shifts in data volume, user activity, and overall website performance.
Step 3: Evaluate Emerging Technologies
- Keep an eye on emerging technologies and trends in backup and cleanup processes.
- Consider adopting new features or tools that could enhance the efficiency and security of your automated system.
Step 4: Seek User Feedback
- Gather feedback from website users and stakeholders regarding their experiences.
- Use this feedback to identify potential areas for improvement in the backup and cleanup processes.
Step 5: Continual Learning
- Stay informed about updates and advancements in backup and cleanup technologies.
- Attend webinars, forums, or industry events to ensure you’re aware of best practices and innovative solutions.
By regularly reviewing and improving your backup and cleanup strategy, you ensure that your WordPress website remains resilient and adaptive to the dynamic nature of the online environment.
By following these steps, you can establish a robust and automated smart snapshot and cleanup system for your WordPress website, enhancing its performance, security, and reliability.